In this guide
- Overview
- Configure Advanced Delivery
- Whitelisting Dune Security Emails
- Receive Connector
- Tenant Allow/Block list -- Spoofing Sender
- Whitelisting using Safe Links Feature
- Dune Security IP Bypass Rule
- Mail Flow rule to force Dune Security emails land in the Focused Inbox
- Add AntiSpam Threat Policy
- Microsoft Defender Link Scanning Bypass Rule
- Microsoft Defender Attachment Scanning Bypass Rule
To ensure that training emails from Dune Security reach your employees' inboxes without getting blocked by security filters or scans, it's important to configure specific rules when your MX record is directed to M365.
Keep in mind that the necessary technical setup depends on where your MX record is currently pointing. If you anticipate any future changes that would result in your MX record no longer pointing to M365, please reach out to us.
Configuring Advanced Delivery (Phishing Simulations)
Set up phishing simulations in Microsoft Defender to ensure Dune Security's simulation emails are properly delivered and not flagged as spam.
Step-by-Step Instructions
1. Access Microsoft Defender Portal
- URL: https://security.microsoft.com
- Alternative Direct Link: Advanced Delivery Page
Instructions:
- Go to https://security.microsoft.com and log in with your administrator credentials.
- Navigate to Email & Collaboration > Policies & Rules > Threat policies > Advanced delivery.
- Alternatively, you can go directly to the Advanced delivery page using this link: https://security.microsoft.com/advanceddelivery.
2. Configure Phishing Simulation in Advanced Delivery
Instructions:
- On the Advanced Delivery page, navigate to the Phishing simulation tab.
3. Domain Configuration
Instructions:
- In the Domains section, add all the current domains or the CNAME for the DKIM domain (if available).
- Use the list of Dune Security domains provided by your Customer Success Manager.
4. Sending IP Configuration
Instructions:
- Add the Dune Security mail server IP address:
52.201.210.35159.183.91.62
Whitelisting
Whitelist Dune's Secure Mail Server
- To ensure seamless communication and data exchange with Dune Security, whitelist our Secure Mail Server IP Address in your firewall and email gateway.
52.201.210.35159.183.91.62
Domain Whitelisting for SEGs
- If your Secure Email Gateway (SEG) requires it, whitelist Dune Security's domains to prevent any emails from Dune Security being marked as spam.

Receive Connector
What is a Receive Connector?
A Receive Connector establishes a direct "pipe" between two mail servers, for instance, between Dune Security and your organization's Exchange Online tenant in Microsoft 365 (M365). This setup allows for more reliable delivery of phishing simulation emails by bypassing third-party filtering systems that may affect normal mail flow.
For more details, refer to:
- Configure mail flow using connectors in Office 365
- Set up connectors for secure mail flow with a partner organization
Why Dune Security Recommends a Receive Connector
- To Bypass Third-Party Systems: Some filtering systems may interfere with the delivery of our simulation emails. A Receive Connector enables Dune Security to send these emails directly to your system (e.g., Office 365 or on-premises Exchange). This setup is particularly beneficial for hybrid environments to minimize mail flow issues.
- To Mitigate Throttling and Greylisting: Microsoft's Exchange Online Protection (EOP) service monitors email sending patterns and may limit your ability to receive our emails due to changes in sending patterns. A Receive Connector helps to mitigate these issues.
Step-by-Step Guide to Create a Partner Receive Connector
Note: The user interface may differ between the on-premises Exchange Admin Center and the M365 Exchange Admin Center. The instructions below are based on the M365 user interface.
Access the Exchange Admin Center
- Go to M365 Exchange Admin Center.
- Navigate to Mail Flow > Connectors, and select + Add a connector.

Configure the New Connector:
- In the New Connector screen, select Partner organization and click Next.
- In the Connector name screen, provide a name for your Dune Security connector.
- Under "What do you want to do after the connector is saved?", tick Turn it on and click Next.


Authenticate Sent Emails:
- In the Authenticating sent email screen, select the option to authenticate by sender IP address.
- Add the Dune Security IP address, and click the + button to add it to the list below.
52.201.210.35159.183.91.62

Set Security Restrictions
- Under Security restrictions screen, use the default values and click Next.
- Important: Ensure that the option "Reject email messages if they aren't sent over TLS" is unchecked.

Review and Create the Connector
- Under the Review connector screen, verify the configuration is correct and click Create connector.


Optional: You can also use the following PowerShell command to configure the Receive Connector in M365 (Exchange Online):
New-InboundConnector -Name "Dune Security Receive Connector" -Enabled $true -SenderDomains * -RequireTls $false -SenderIPAddresses 52.201.210.35
Introduction
This guide will walk Microsoft user admins through the process of enabling Dune Security to send phishing email assets with improved deliverability for Microsoft Tenants. The steps will involve adding Dune Security’s IP address to the Microsoft Tenant Allow/Block List to ensure phishing simulation emails are not blocked or marked as spam.
Step-by-Step Guide
Access the Microsoft Security Portal
- Go to: Microsoft Security Portal

Navigate to Threat Policies
- Log in to the portal with your admin credentials.
- Go to the "Email & collaboration" section by opening the accordion menu.
- Click on "Policies & rules".
- Select "Threat policies".

Configure the Tenant Allow/Block List
- Click on "Tenant Allow/Block List".
- Select "Spoofed Senders".

Add Spoofed Sender
- Click on "Add".
- In the "Add domain pairs with wildcards" field, enter:
*, 52.201.210.35
- Set the Spoof type to "External".
- Set the Action to "Allow".
- Click "Add" to save the configuration.
Whitelist using the Safe Links Feature
-
Access the Microsoft Security Center:
-
Navigate to Safe Links:
- Go to Email & Collaboration > Policies & Rules > Threat Policies.
- Direct link: Threat Policies
-
Create a New Safe Links Rule:
- Select Safe Links and click Create.
-
Configure the Rule:
- Name: Enter "Dune Security Safe Links Rule" (or your preferred name).
- Description: Add a suitable description.
-
Assign Users, Groups, and Domains:
- Specify the users, groups, and domains that will receive the testing.
-
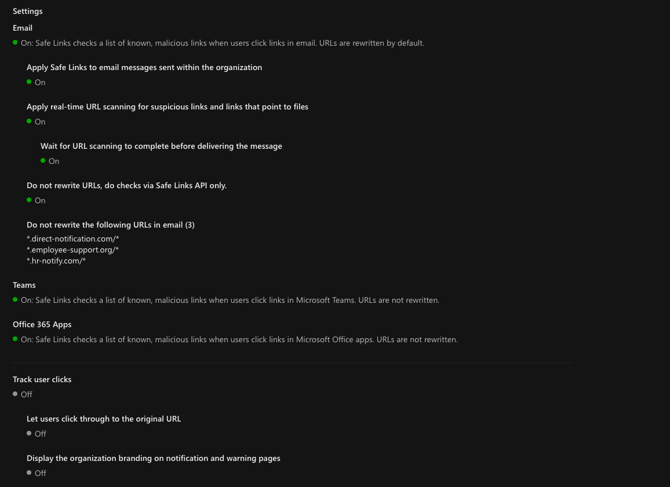
Adjust Settings:
- Track user clicks: Deselect this option.
-
Exclude Dune Security Domains:
- Under "Do not rewrite the following URLs in email," add Dune Security's send-from domains, provided by your Customer Success Manager.
- Under "Do not rewrite the following URLs in email," add Dune Security's send-from domains, provided by your Customer Success Manager.
-
Activate the Policy:
- Once the policy is created, ensure that it is Turned On.
Create the "Dune Security IP Bypass" Rule
Introduction
To ensure successful phishing simulations, follow these steps to configure Safe Links in the Microsoft Security Center.
-
Access the Exchange Admin Center:
- Log in to your Exchange Admin Center using your admin credentials.
- Navigate to the "Mail Flow" section.
-
Create a New Rule:
- Click on "Rules" under the Mail Flow section.
- Select "New Rule" to create a new mail flow rule.

-
Configure the Rule:
- Name the Rule: Enter "Dune Security IP Bypass" as the name of the rule.
- Apply the Rule If:
- In the "Apply this rule if" dropdown, select "The sender's IP address is in any of these ranges or exactly matches."
52.201.210.35159.183.91.62
- In the "Apply this rule if" dropdown, select "The sender's IP address is in any of these ranges or exactly matches."
-
- Do the Following:
- In the "Do the following" dropdown, select "Modify the message properties" > "Set the spam confidence level (SCL)."
- Set the SCL value to "Bypass Spam Filtering."

- Do the Following:
-
Set Additional Options:
- Rule Mode: Set the rule to "Enforce" mode.
- Severity: Set the severity level to "High."
- Stop Processing More Rules: Enable this option to ensure no other rules override this one.

-
Enable the Rule and Set Priority:
- Ensure the rule is enabled by checking the "Enabled" box.
- Set the rule's priority to
0, making it the highest priority.
-
Save and Apply:
- Review the rule configuration to ensure everything is correct.
- Click "Save" to apply the rule.
Mail Flow Rule to Force Dune Security Emails Landing in the Focused Inbox
Focused Inbox automatically categorizes incoming emails into two tabs: "Focused" and "Other." To ensure that Dune Security simulated phishing(Kaila) emails consistently appear in the "Focused" tab, you need to bypass the filtering process for these specific emails.
- Log in to Exchange/M365 Admin Center (M365 Admin Center)
- Navigate to the "Mail Flow" section (Mail Flow)
- Choose + and Create a new rule
- Give the rule a name, such as "Focused Inbox for Dune Security"
- Configure the Rule
- Name: Focused Inbox for Dune Security
- Apply the rule if:
- "The sender's IP Address is in any of these ranges or exactly matches"
- Enter the Dune Security IP Address (provided by your Customer Success Manager) .
- Do the following:
- Select "Modify the message properties" > "Set a message header"
- Set the message header `X-MS-Exchange-Organization-BypassFocusedInbox` to the value `true`

Review the changes and save the rule. Make sure you enable it
Note: Make sure to move all Dune Security rules to the top (high priority)
Add AntiSpam Threat Policy
- Log In to Microsoft Security Center (Microsoft Security Center )
- Navigate to the Policies and Rules section under Email and Collaboration
- Click on Threat Policies
- Under Policies Tab click on Anti Spam
- Click on edit Connection Filter Policy:
- Add the Dune Security IP address in "Always allow messages from the following IP addresses or address range"
52.201.210.35159.183.91.62
- Add the Dune Security IP address in "Always allow messages from the following IP addresses or address range"
-
- Toggle "Turn on safe list" , set it to On
Mail Flow rule to Bypass Defender Link processing
- Log in to Exchange/M365 Admin Center
- In the left hand side navigation bar go to mail flow
- Choose + and Create a new rule
- Name the rule, for example "Bypass Defender Links for DuneSecurity"
- Apply this rule if senders IP address is in the range of or exactly matches the Dune Security IP Address.
52.201.210.35159.183.91.62
- Do the following:
- Select Modify the message properties
- Set the message header: "X-MS-Exchange-Organization-SkipSafeLinksProcessing"
- To value: 1

Mail Flow Rule to Bypass Defender Attachment Processing
- Log in to Exchange/M365 Admin Center
- In the left hand side navigation bar go to mail flow
- Choose + and Create a new rule
- Name the rule, for example "Bypass Defender Attachments for DuneSecurity"
- Apply this rule if senders IP address is in the range of or exactly matches the Dune Security IP Address (provided by your Customer Success Manager).
- Do the following:
- Select Modify the message properties
- Set the message header: "X-MS-Exchange-Organization-SkipSafeAttachmentProcessing"
- To value: 1

Summary
By following these steps, you ensure that Dune Security's phishing simulation emails are reliably delivered to your users, improving the effectiveness of your security training programs.
For further assistance, please contact Dune Security Support at support@dune.security.